智慧教室系统
更新: 2025/3/13 12:08:48 字数: 0 字
1. 系统介绍
该系统主要是在学校期间,为新的教务系统做的一个智慧管理界面,我主要负责智慧教室信息的录入和展示, 负责前端的页面设计,以及页面布局数据的存储。
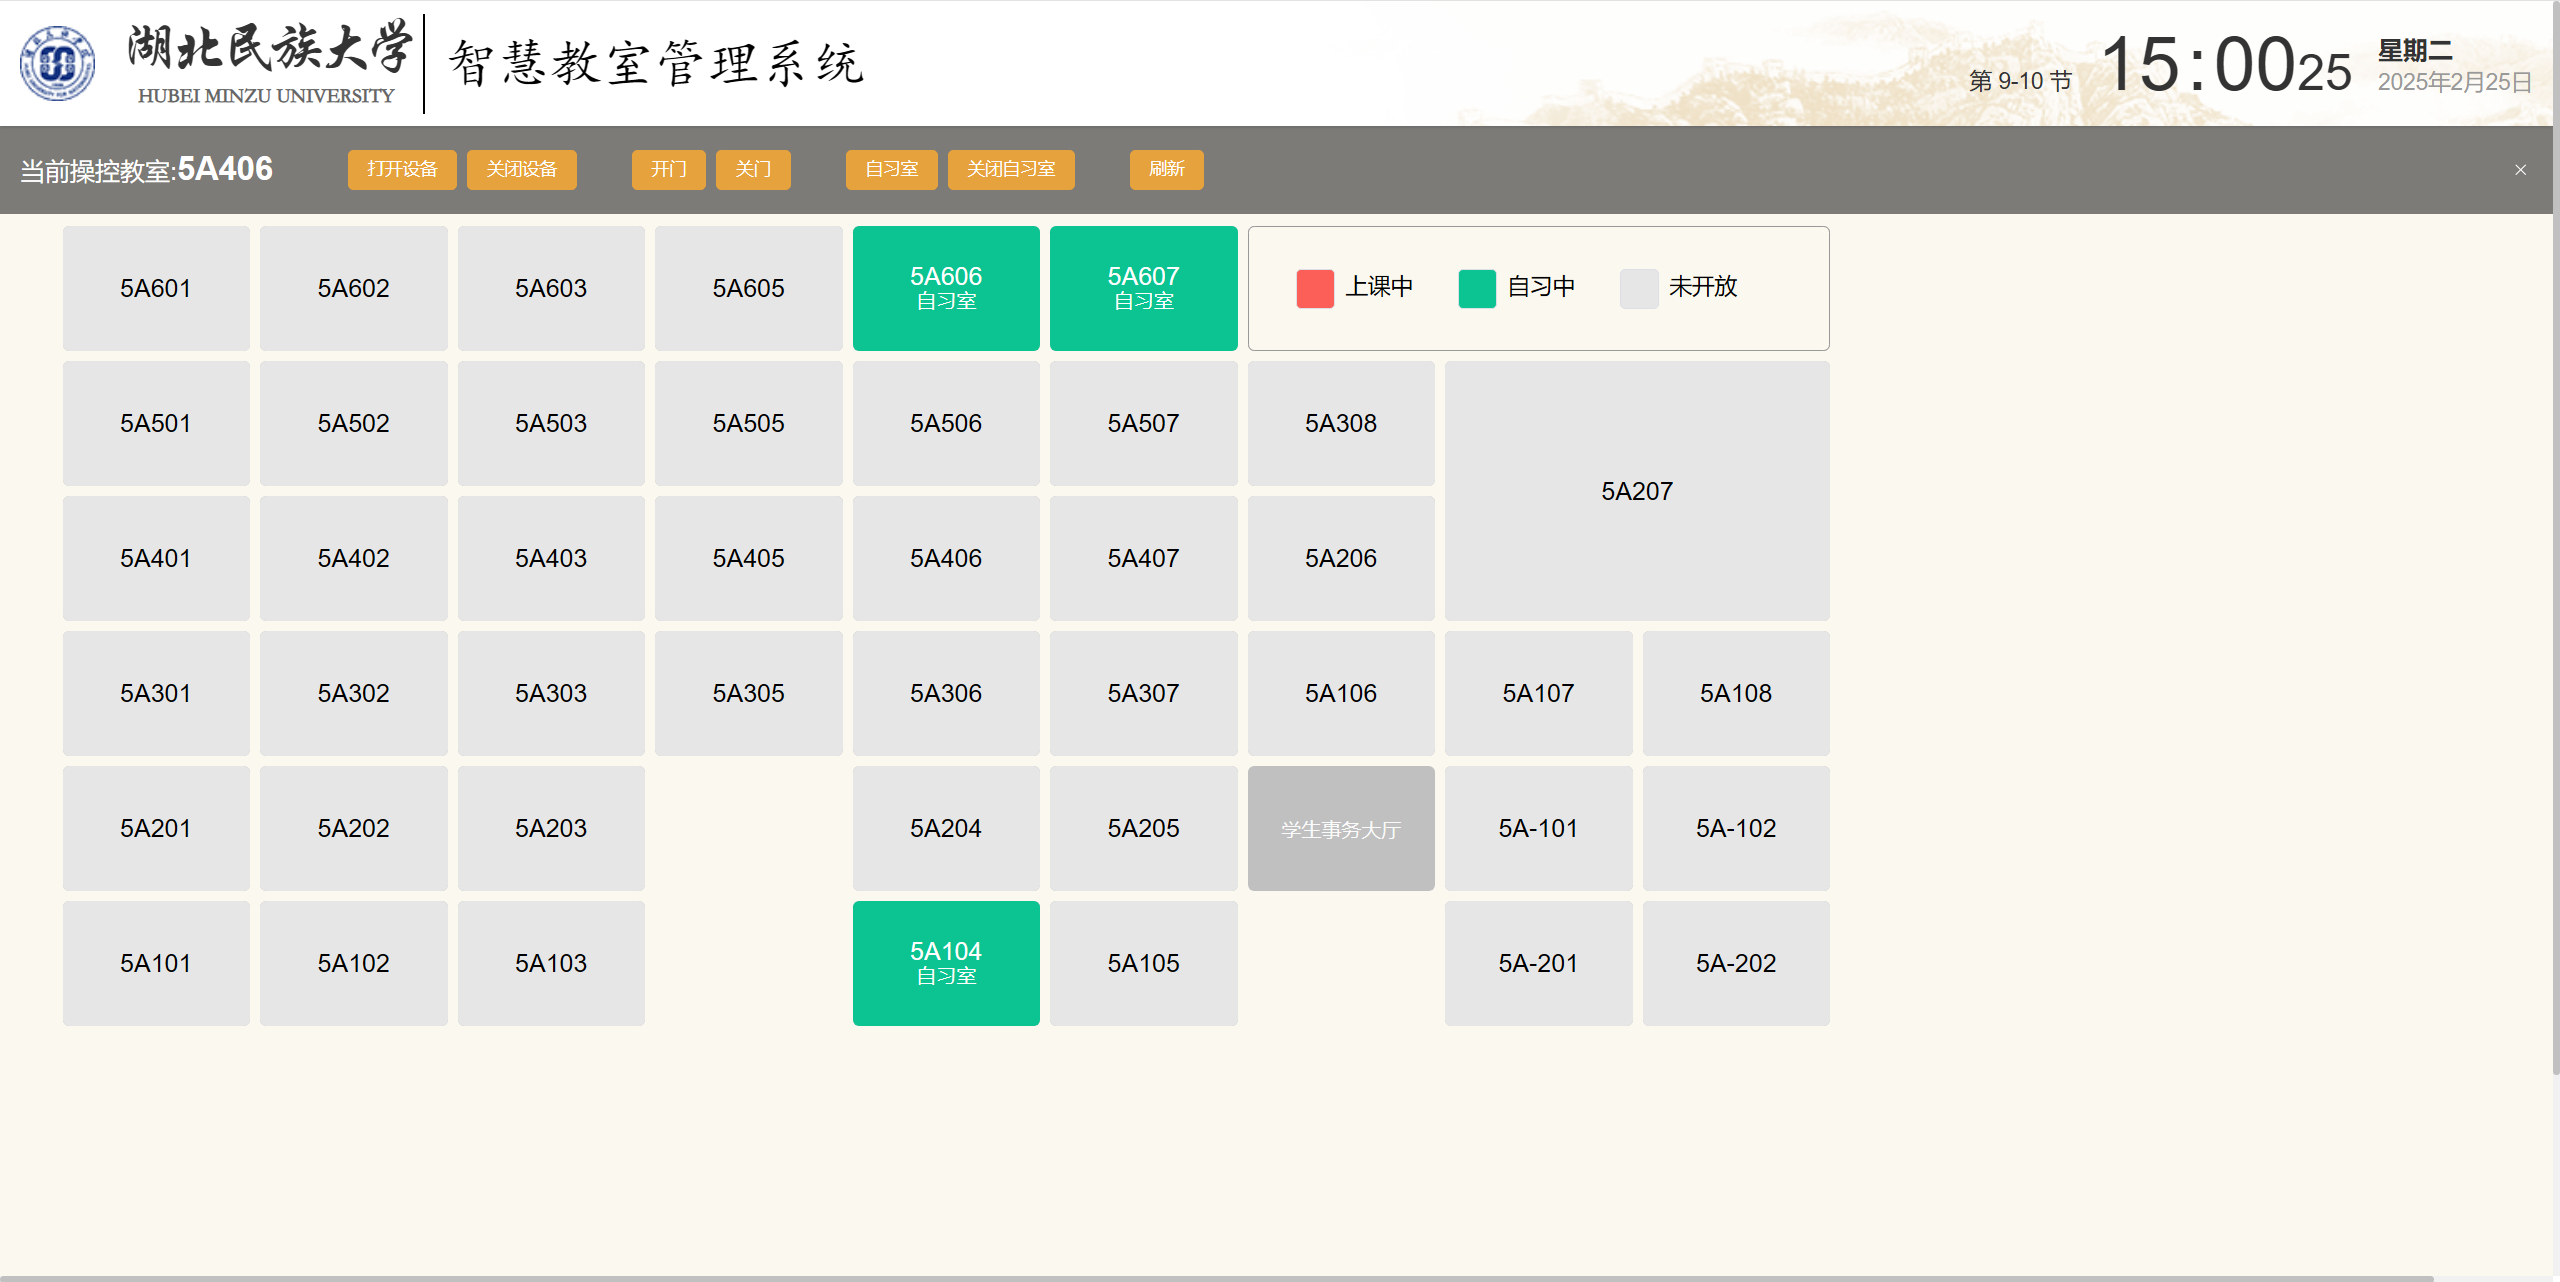
介绍一下该项目的作用,以图形的方式录入整个教学楼的教室信息,并以图形的方式展示出来,方便查看每间教室的使用情况, 并且可以操控每间教室的开关灯,开关电脑设施,开关门等功能。
2. 需求分析
- 对系统进行升级,实现动态录入教学楼教室的布局信息,并且可以将其按照存储的布局渲染出来,最终展示的界面会在教学楼的电视中展示出来。
- 实现稳定的
websocket连接,实现对布局中的每个教室信息进行实时监测和控制,可以展示每个教室当前的状态,以及控制其设备。 - 要封装请求,实现对教室信息的实时控制,比如 开关灯,开关电脑,开关门 等。
3. 使用技术
前端:vue.js、 vue-router、 element-plus、 axios 、vite 等 vue 生态。
后端:spring-boot、sql-server、mybatis-plus 等后端环境。
前端可能使用的组件库:grid-layout-plus 这种类型的布局组件库、 logic-flow 画布流程组件库。实在不行就自己做一个。
初始效果:使用 grid-layout-plus 组件库来收录教室布局信息,教室的位置是可配置的,并且可以拖动。
在做该系统的时候,主要就是要解决教学楼中教室信息的录入以及展示,录入要实现可控拖拽录入,并且可以随时进行编辑。 经过思考,我决定使用 grid-layout-plus 组件库,因为这个栅格布局系统可以对元素进行拖拽,可以实现我们所需要的功能。
其实在录入的过程中,我们只需要将对应的元素拖拽到对应的位置,后面这个系统会生成对应的数据,后端数据库存储数据即可。
这个效果其实我们很常见,比如 iTab 这个浏览器插件,他也可以说实现对应的效果,只不过他是通过 grid 布局来实现,但是 grid 布局可能存在兼容性问题,所以就使用 grid-layout-plus 组件库。
4. 存储布局数据类型
以 pointId 智慧教室点为一组数据,每组数据的 pointId 相同,通过 type 字段来区别类型, 如果是 图例 那么type 为 1 ,教室 为 2 ,占位图形为 3 ,x,y,w,h 为坐标信息。这样就可以将布局给存储起来了。
@Data
public class  SmartPointLayout {
    /**
    * 主键 id
    */
    private Integer id;

    // 教室 id
    private Integer jsId;

    /**
     * 房间号
     */
    private String fjh;

    /**
     * 名称
     */
    private String name;

    /**
     * type
     */
    private Integer type;

    /**
     * 起始点x坐标
     */
    private Integer x;
    /**
     * 起始点y坐标
     */
    private Integer y;
    /**
     * 宽度上占多少个距离
     */
    private Integer w;
    /**
     * 高度上占多少个距离
     */
    private Integer h;

    /**
     * 使用的图形的形状
     */
    private String shape;

    /**
     * 智慧教室点
     */
    private Integer pointId;
}
这个就是我们需要存储的数据,他就描述了一个智慧教室点 pointId 的布局信息。
{id: 1, jsId: null, fjh: null, name: null, type: 1, x: 6, y: 0, w: 3, h: 1, shape: "rectangle", pointId: 51}
{id: 2, jsId: 285, fjh: "5A104", name: null, type: 2, x: 4, y: 5, w: 1, h: 1, shape: "rectangle", pointId: 51}
{id: 3, jsId: 280, fjh: "5A101", name: null, type: 2, x: 0, y: 5, w: 1, h: 1, shape: "rectangle", pointId: 51}
{id: 4, jsId: 290, fjh: "5A207", name: null, type: 2, x: 7, y: 1, w: 2, h: 2, shape: "rectangle", pointId: 51}
{id: 5, jsId: 292, fjh: "5A302", name: null, type: 2, x: 1, y: 3, w: 1, h: 1, shape: "rectangle", pointId: 51}
{id: 6, jsId: null, fjh: null, name: "学生事务大厅", type: 3, x: 6, y: 4, w: 1, h: 1, shape: "rectangle", pointId: 51}
{id: 7, jsId: 307, fjh: "5A606", name: null, type: 2, x: 4, y: 0, w: 1, h: 1, shape: "rectangle", pointId: 51}
{id: 8, jsId: 304, fjh: "5A601", name: null, type: 2, x: 0, y: 0, w: 1, h: 1, shape: "rectangle", pointId: 51}
{id: 9, jsId: 305, fjh: "5A602", name: null, type: 2, x: 1, y: 0, w: 1, h: 1, shape: "rectangle", pointId: 51}
{id: 10, jsId: 306, fjh: "5A605", name: null, type: 2, x: 3, y: 0, w: 1, h: 1, shape: "rectangle", pointId: 51}
5. 初稿页面展示
以 grid-layout-plus 组件库为例做的初稿。
智慧教室系统展示,下面的表格展示的是教学楼栋信息,我们可以看到每个教学楼栋的教室信息,并且可以进行编辑和删除。 
编辑楼栋信息,可以向整个楼栋添加对应的教室信息,并且可以进行编辑和删除。 
展示楼栋信息,通过 grid-layout-plus 组件库,可以展示教室的位置,通过 websocket 可以看到每个教室的使用情况,并且可以控制教室的设备信息。 
6. 实现思路和具体过程
websocket 连接
自己封装了一个 websocket 连接,在连接的时候,会自动进行心跳包,如果断开连接,会自动进行重连 (断网重连机制)。
var ws;
var stop = false;
var pointID; //业务点id
var editFlag = 0; //通知通告编辑页面标记
var Type; //业务点类型
var url = "";  // websocket服务器连接点url
var needRefresh = false;
var heartCheck = {
    timeout: 60000,//60s
    timeoutObj: null,
    state: 1, // 1-超时断网        2-重连
    serverTimeoutObj: null,
    reset: function (value) {
        // 清除计时器
        clearTimeout(this.timeoutObj);
        clearTimeout(this.serverTimeoutObj);
        this.start(value);
    },
    start: function (value) {
        var self = this;
        this.state = value;
        // 60s 后发送心跳包
        this.timeoutObj = setTimeout(function () {
            ws.send('{"type":"heart"}');
            // 60s 后没有收到服务器的响应,则判断为超时
            self.serverTimeoutObj = setTimeout(function () {
                if (1 == heartCheck.state) {
                    heartCheck.state = 2;
                    ws.close();
                } else {
                    connect(); //断网重连
                }
            }, self.timeout)
        }, this.timeout)
    },
}

/**
 * 通过参数获取pointid的连接方式
 * @param type 服务点类型
 * @returns
 */
function startConnect(point, type) {
    console.log("页面渲染完毕")
    setURL();
    pointID = point;
    Type = type;
    connect();
}

/**
 * 设置websocket连接的URL
 */
function setURL() {
    url = "ws://xxx..."
}

function connect() {
    if (stop == true) {
        return;
    }
    if ('WebSocket' in window) {
        ws = new WebSocket(url);
    } else if ('MozWebSocket' in window) {
        alert("创建MozWebSocket连接");
        ws = new MozWebSocket(url);
    } else {
        alert('WebSocket is not supported by this browser.');
        return;
    }

    // websocket 连接成功回调
    ws.onmessage = function (event) {
        var obj = JSON.parse(event.data);
        if (obj.type == "notice") {
            //通知通告信息
        } else if (obj.type == "monitor") {
            // TODO 对接数据, 信息展示
            control(obj);
        } else if (obj.type == "heart") {
            //心跳包
        }
        // 发送心跳包
        heartCheck.reset(1);
    };

    ws.onopen = function (event) {
        console.log("yes");
        heartCheck.start(1);
        //monitor notice
        ws.send('{"type":"' + Type + '","point":' + pointID + ',"cmd":1}');
        //获取权限
        getPower();
    }

    // 连接关闭
    ws.onclose = function () {
        // 触发重连
        heartCheck.reset(2);
    }

    // 连接出错,会关闭 webSocket 连接
    ws.onerror = function () {
        ws.close();
    };

    //监听窗口关闭事件,当窗口关闭时,主动去关闭websocket连接,
    // 防止连接还没断开就关闭窗口,server端会抛异常。
    window.onbeforeunload = function () {
        stop = true;
        ws.close();
    }

}

// 发送消息
function send() {
    // TODO 这里需要替换成实际发送的内容
    const value = ""
    ws.send(value);
}
渲染展示
我们通过grid-layout-plus组件库,保存了每个教室的位置,但是在渲染的时候,我们必须控制每个教室渲染的大小,于是我就自己写了个算法, 来将录入的信息重新渲染出来。
在下面组件中我们使用 createBoxStyle 来根据 layout 来生成每个盒子的样式。最后通过相对定位和绝对定位来确定每个盒子的位置。
<script setup>
  import {shangKeList, weiKaiFangList, zhiXiList} from '../websocket'

  const $emit = defineEmits(['update:selectClass'])
  const props = defineProps({
    layout: {},
    selectClass: {
      type: Object,
    }
  })

  // 生成盒子样式
  const createBoxStyle = (item) => {
    const laX = item.x / 1 > 0 ? item.x / 1 : 0
    const laY = item.y / 1 > 0 ? item.y / 1 : 0
    const _w = item.w / 1
    const _h = item.h / 1
    return {
      marginLeft: item.x * 150 + laX * 8 + `px`,
      marginTop: item.y * 100 + laY * 8 + `px`,
      width: (150 * _w) + (_w - 1) * 8 + `px`,
      height: (100 * _h) + (_h - 1) * 8 + `px`,
    }
  }

  const handleClick = (item) => {
    $emit('update:selectClass', item)
  }
</script>

<template>
  <div id="mainContainer" class="view_container">
    <div class="base_box" v-for="(item, index) in layout" :style="createBoxStyle(item)" :key="item.id">
      <div v-if="item.type === 1" class="content_box_1">
        <el-space :size="36">
          <div>
            <el-button style="background-color: #fc5e58"/>
            <span style="margin-left: 8px">上课中</span>
          </div>
          <div>
            <el-button style="background-color: #0cc492"/>
            <span style="margin-left: 8px">自习中</span>
          </div>
          <div>
            <el-button style="background-color: #e6e6e6"/>
            <span style="margin-left: 8px">未开放</span>
          </div>
        </el-space>
      </div>

      <div v-else-if="item.type === 2" class="content_box_2"
           :class="{
              active_color_01: shangKeList.has(item.jsId),
              active_color_02: zhiXiList.has(item.jsId),
              active_color_03: weiKaiFangList.has(item.jsId),
            }"
           @click="handleClick(item)">
        <div v-if="zhiXiList.has(item.jsId)">
          <p>{{item.fjh }}</p>
          <p>自习室</p>
        </div>
        <div v-if="shangKeList.has(item.jsId)">
          <p>{{item.fjh }}</p>
          <p>{{shangKeList.get(item.jsId).course}}</p>course
        </div>
        <div v-if="weiKaiFangList.has(item.jsId)">
          <p>{{item.fjh }}</p>
        </div>
      </div>
      <div v-else-if="item.type === 3" class="content_box_3">
        {{item.name}}
      </div>
    </div>
  </div>
</template>

<style scoped lang="scss">
  .view_container {
    position: relative;

    .base_box {
      display: flex;
      justify-content: center;
      align-items: center;
      position: absolute;
      border-radius: 5px;
      background-color: #c0c0c0;
      color: #fafafa;

      .content_box_1 {
        width: 100%;
        height: 100%;
        display: flex;
        align-items: center;
        justify-content: space-evenly;
        border: 1px solid #999;
        color: black;
        font-size: 18px;
        border-radius: 5px;
        background-color: #fbf8ef;
      }

      .content_box_2 {
        height: 100%;
        width: 100%;
        display: flex;
        justify-content: center;
        align-items: center;
        border-radius: 5px;
        /*行间距*/
        flex-direction: column;

        p {
          text-align: center;
          line-height: 20px;
          margin: 0;

          &:first-child {
            font-size: 20px;
          }
        }

        &.active_color_01 {
          background-color: #fc5e58 !important;
        }

        &.active_color_02 {
          color: white;
          background-color: #0cc492 !important;
        }

        &.active_color_03 {
          color: black;
          background-color: #e6e6e6 !important;
        }

        &:hover {
          box-shadow: 0 0 10px #57717d;
        }
      }

      .content_box_3 {
        height: 100%;
        width: 100%;
        display: flex;
        justify-content: center;
        align-items: center;
      }

    }
  }
</style>
但是这样有个问题,就是他没有居中,给元素加上宽度使其居中。
<script setup>
  const BoxWidth = ref(0)
  let maxW = 0
  const createBoxStyle = (item) => {
    const laX = item.x / 1 > 0 ? item.x / 1 : 0
    const laY = item.y / 1 > 0 ? item.y / 1 : 0
    const _w = item.w / 1
    const _h = item.h / 1
    if(maxW < laX){
      maxW = laX
      BoxWidth.value = laX * 8 + 150 * item.x + (150 * item.w + (item.w - 1) * 8)
    }
    return {
      marginLeft: item.x * 150 + laX * 8 + `px`,
      marginTop: item.y * 100 + laY * 8 + `px`,
      width: (150 * _w) + (_w - 1) * 8 + `px`,
      height: (100 * _h)  + (_h - 1) * 8 + `px`,
    }
  }


</script>

<template>
  <div  class="view_container" :style="{
    width: BoxWidth + 'px',
    height: '100%',
  }">

  </div>
</template>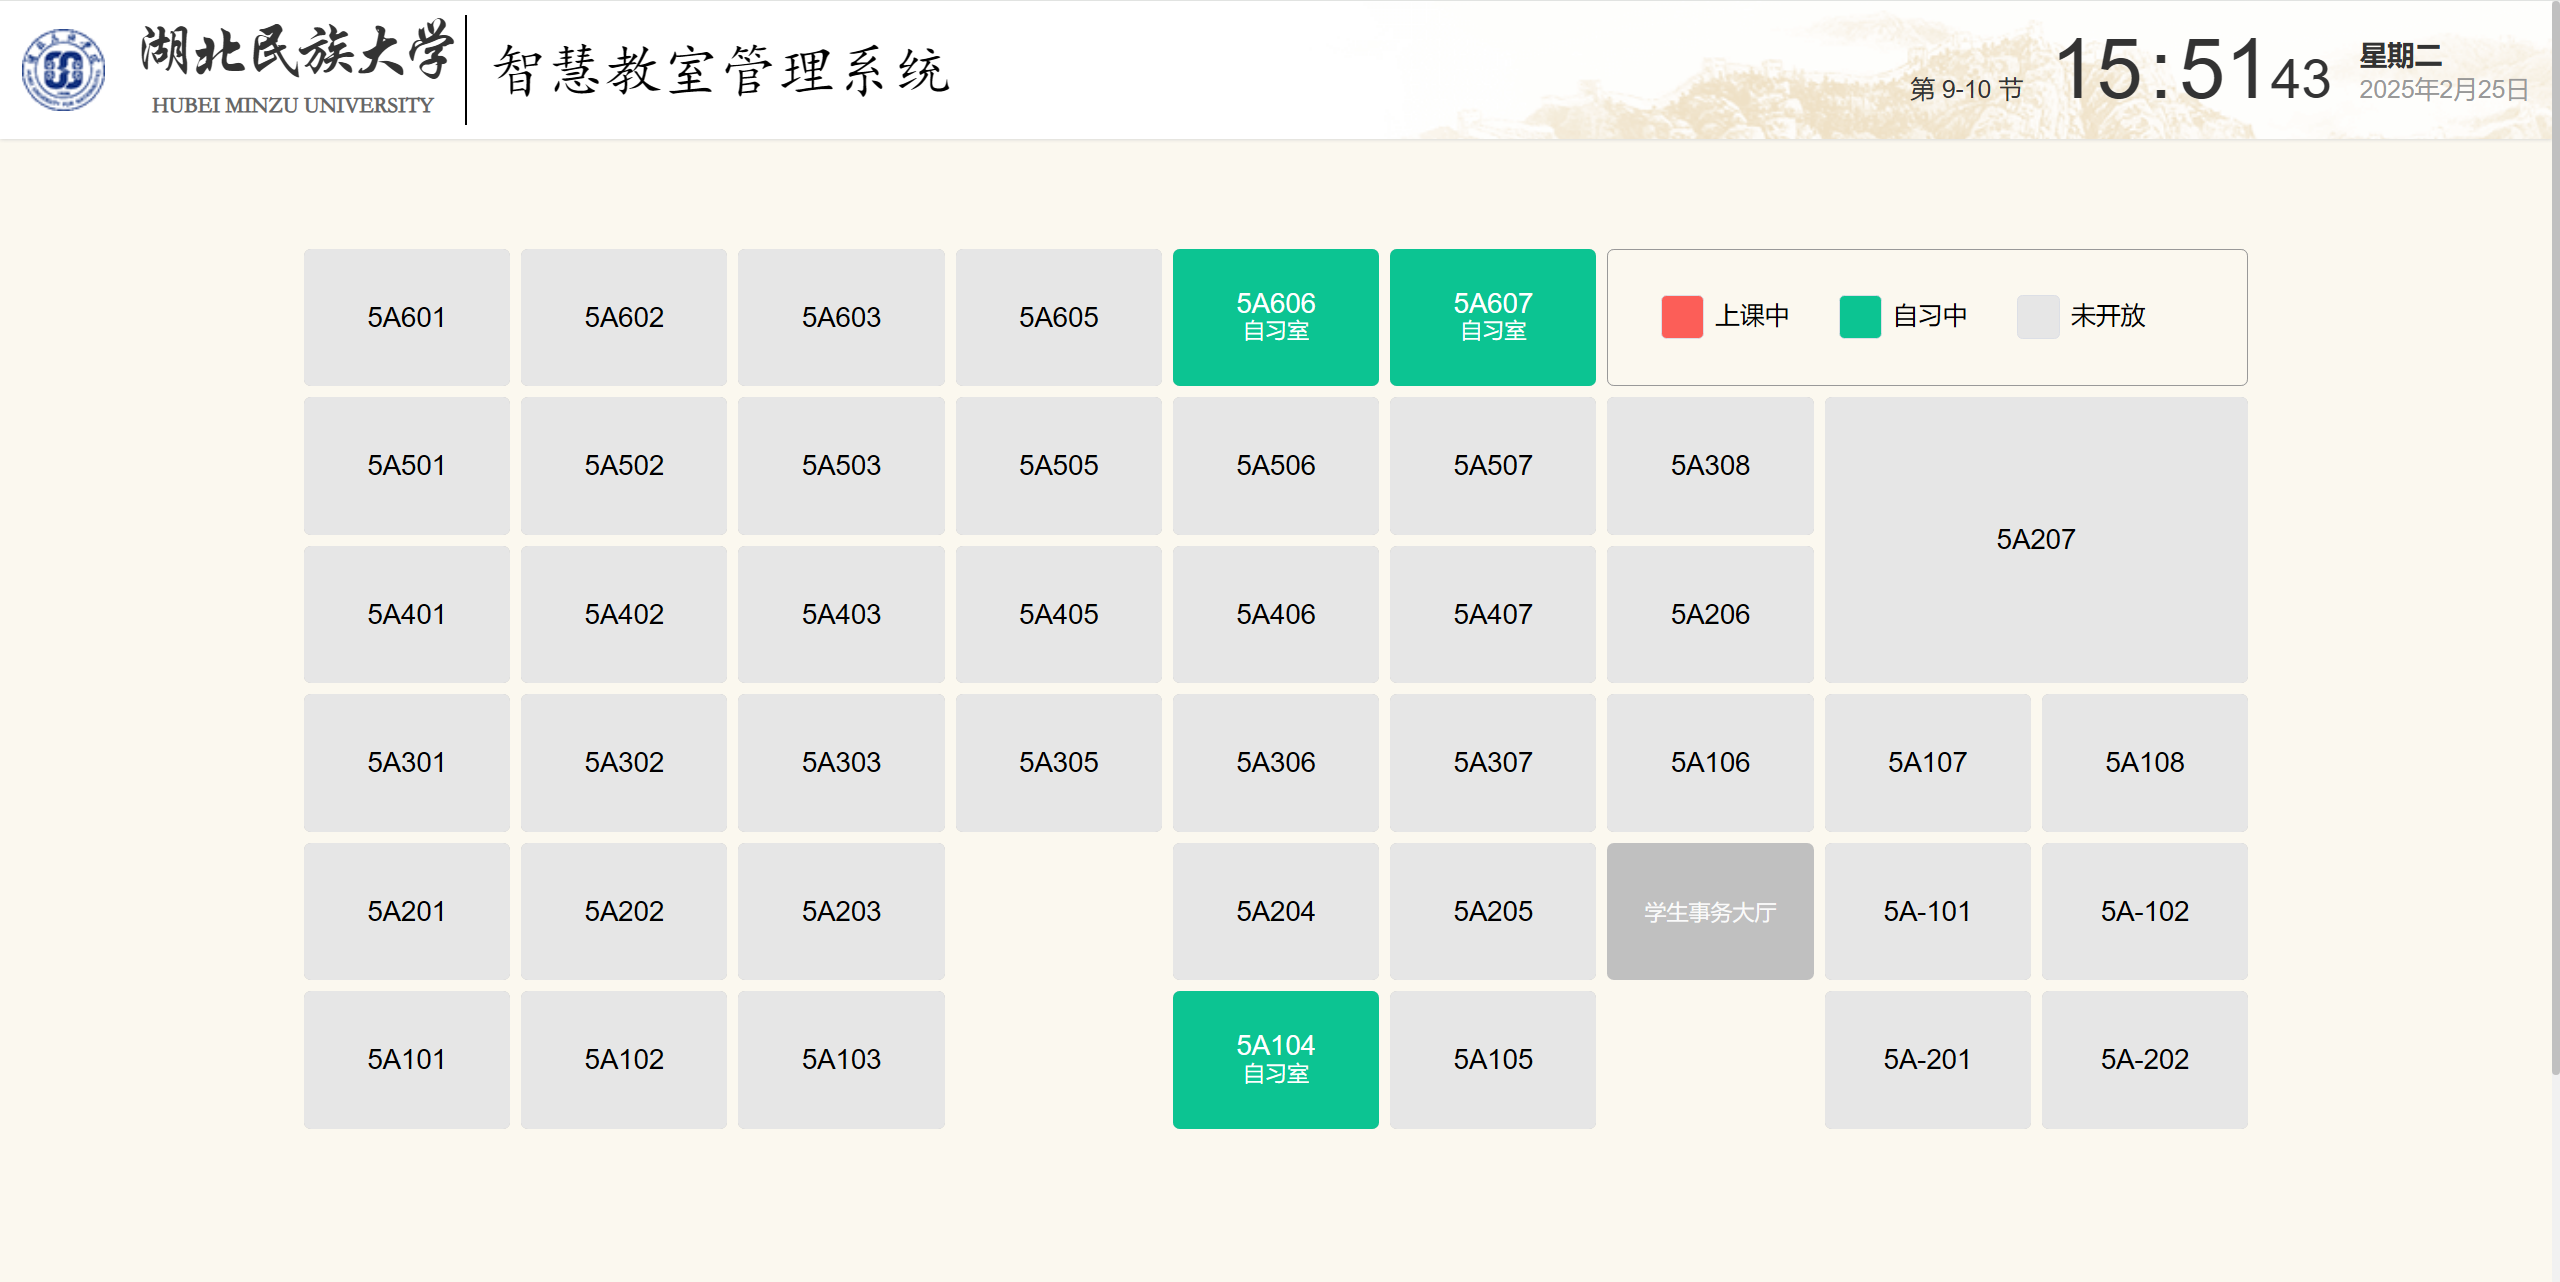
综上所述,做的很好了,但是,有一个问题,就是与原本的布局相对比,原本的左边的和右边是分开的, 但是按照我们现在的思路来看,忽略了这一点,那么我们重新去思考,有没有一个组件可以 实现我们的需求,他有背景网格,每次拖拽放大和缩小,都是在网格线上。
7. 新版本开发
旧版本的不足
- 最终的展示是要在电视上进行展示的,展示的时候得和电视屏幕相匹配。
- 要实现的是所见及所得,我拖拽时的布局是什么样子,展示时就是什么布局。
- 主要就是为了方便实时修改展示的效果,如果发现自己的布局的展示效果在电视大屏上展示的不好,可以随时进行修改。
新版本的细节需求
我之前做过流程设计器,有一个叫做 logcflow 的组件库,他就能够实现我们类似的效果。 起初我是想使用 logcflow 这个组件库,但是后来发现,这个组件库有些问题(可能是我阅读文档得到问题吧),有一些对应的函数没找到。 就比如说我想让其元素在拖拽的时候移动的单位长度必须是 5 的倍数,但是 logcflow 这个组件库并没有提供这个功能。 我自己也尝试修改过其 drag 逻辑,但是效果总是差强人意,而且它的说明文档不是很全面。其二,项目又要导入新的依赖,这样打包提交又会变大。
于是乎,我自己做一个不就得了,感觉也不是很难,主要解决以下问题:
需求
- 最好要有背景,并且是网格纸或者是点阵纸,这个是参考坐标,x为其网格之间的距离。
- 生成的元素,边都要在网格上,也就是说如果是矩形,那么它的边都要在网格上,并且是x的倍数。
- 在对元素进行缩放时,缩放后的宽高也要是x的倍数。
- 在对元素进行拖拽时,拖拽后的位置也要是x的倍数。
- 画布很大,允许拖拽画布。
- 鼠标右键可以进行多选,被选中的元素可以一起进行拖拽。
- 删除和缩放元素功能要比较显眼好用。
- ...
代码实现
点我查看代码
<script setup>
  import {computed, ref} from "vue";
  import {useVModel} from "@vueuse/core";
  import ClassBox from "./model/ClassBox.vue";
  import TuLiBox from "./model/TuLiBox.vue";
  import RectBox from "./model/RectBox.vue";

const canvasWrapperRef = ref(null)
const canvasGrid = ref(null)

const canvasOffsetX = ref(0)
const canvasOffsetY = ref(0)
const scale = ref(1)

const canvasStyle = computed(() => ({
transform: `translate(${canvasOffsetX.value}px, ${canvasOffsetY.value}px) scale(${scale.value})`,
transformOrigin: '0 0',
}))

const props = defineProps({
modelValue: {
type: Array,
required: true,
default: () => []
}
})
const $emit = defineEmits(['update:modelValue'])
const _modelValue = useVModel(props, 'modelValue', $emit)

// 被选中的元素集合
const selectedElementIndices = ref([])
const selectedElementIndex = ref([])

const getComponentByType = (type) => {
switch (type){
case 1:
return ClassBox
case 2:
return TuLiBox
case 3:
return RectBox
}
}

function elementClass(type) {
switch (type) {
case 1:
return 'element_box1'
case 2:
return 'element_box2'
case 3:
return 'placeholder'
default:
return ''
}
}


function onCanvasWheel(event) {
event.preventDefault()
const scaleChange = event.deltaY * -0.001;
const newScale = Math.min(Math.max(scale.value + scaleChange, 0.5), 2);

    // 计算鼠标位置相对于画布的位置
    const rect = canvasWrapperRef.value.getBoundingClientRect();
    const mouseX = (event.clientX - rect.left - canvasOffsetX.value) / scale.value;
    const mouseY = (event.clientY - rect.top - canvasOffsetY.value) / scale.value;

    // 计算新的偏移量
    canvasOffsetX.value -= mouseX * (newScale - scale.value);
    canvasOffsetY.value -= mouseY * (newScale - scale.value);

    scale.value = newScale;
}

function zoomIn() {
scale.value = Math.min(scale.value + 0.1, 2)
}

function zoomOut() {
scale.value = Math.max(scale.value - 0.1, 0.5)
}

const offsetX = ref(0)
const offsetY = ref(0)
const draggingIndex = ref(null)
function startDrag(index, event) {
if (event.button === 2) return; // Ignore right-click drag
if (selectedElementIndices.value.includes(index)) {
// 开始多选拖动
startMultiDrag(event);
} else {
draggingIndex.value = index
offsetX.value = (event.clientX - _modelValue.value[index].x * scale.value) / scale.value
offsetY.value = (event.clientY - _modelValue.value[index].y * scale.value) / scale.value
document.addEventListener('mousemove', onDrag)
document.addEventListener('mouseup', stopDrag)
}
}

function startMultiDrag(event) {
const initialPositions = selectedElementIndices.value.map(index => ({
index,
x: _modelValue.value[index].x,
y: _modelValue.value[index].y,
}));
offsetX.value = event.clientX;
offsetY.value = event.clientY;
document.addEventListener('mousemove', onMultiDrag);
document.addEventListener('mouseup', stopMultiDrag);

    function onMultiDrag(event) {
      const deltaX = (event.clientX - offsetX.value) / scale.value;
      const deltaY = (event.clientY - offsetY.value) / scale.value;
      initialPositions.forEach(pos => {
        _modelValue.value[pos.index].x = pos.x + deltaX;
        _modelValue.value[pos.index].y = pos.y + deltaY;
      });
    }

    function stopMultiDrag() {
      document.removeEventListener('mousemove', onMultiDrag);
      document.removeEventListener('mouseup', stopMultiDrag);
    }
}


function onDrag(event) {
if (draggingIndex.value !== null) {
const x = Math.round((event.clientX / scale.value - offsetX.value) / 5) * 5
const y = Math.round((event.clientY / scale.value - offsetY.value) / 5) * 5
_modelValue.value[draggingIndex.value].x = x
_modelValue.value[draggingIndex.value].y = y
}
}

function stopDrag() {
draggingIndex.value = null
document.removeEventListener('mousemove', onDrag)
document.removeEventListener('mouseup', stopDrag)
}

function selectElement(event, index) {
event.preventDefault()
event.stopPropagation()
selectedElementIndex.value = index
}
function deselectElement() {
selectedElementIndex.value = null
selectedElementIndices.value = []
}
// 删除对应的文件
function deleteElement(index) {
_modelValue.value.splice(index, 1)
}


const resizingIndex = ref(null); // 当前正在缩放的元素索引
const initialWidth = ref(0); // 初始宽度
const initialHeight = ref(0); // 初始高度
/**
* 缩放
  */
  function startResize(index, event) {
  resizingIndex.value = index;
  initialWidth.value = _modelValue.value[index].width;
  initialHeight.value = _modelValue.value[index].height;
  offsetX.value = event.clientX;
  offsetY.value = event.clientY;

    function onResize(event) {
      if (resizingIndex.value !== null) {
        const width = Math.round((initialWidth.value + (event.clientX - offsetX.value) / scale.value) / 5) * 5;
        const height = Math.round((initialHeight.value + (event.clientY - offsetY.value) / scale.value) / 5) * 5;
        _modelValue.value[resizingIndex.value].width = width > 0 ? width : 5;
        _modelValue.value[resizingIndex.value].height = height > 0 ? height : 5;
      }
    }

    function stopResize() {
      resizingIndex.value = null
      document.removeEventListener('mousemove', onResize)
      document.removeEventListener('mouseup', stopResize)
    }


    document.addEventListener('mousemove', onResize);
    document.addEventListener('mouseup', stopResize);
}

const canvasDragging = ref(false);
const canvasStartX = ref(0);
const canvasStartY = ref(0);


// 画布移动
function startCanvasDrag(event) {
event.preventDefault();
event.stopPropagation();
canvasDragging.value = true
canvasStartX.value = event.clientX - canvasOffsetX.value
canvasStartY.value = event.clientY - canvasOffsetY.value

    function onCanvasDrag(event) {
      if (canvasDragging.value) {
        canvasOffsetX.value = event.clientX - canvasStartX.value
        canvasOffsetY.value = event.clientY - canvasStartY.value
      }
    }

    function stopCanvasDrag() {
      canvasDragging.value = false
      document.removeEventListener('mousemove', onCanvasDrag)
      document.removeEventListener('mouseup', stopCanvasDrag)
    }

    document.addEventListener('mousemove', onCanvasDrag)
    document.addEventListener('mouseup', stopCanvasDrag)
}


// 选择框
const isMouseDown = ref(false);
const selectionBox = ref({
visible: false,
startX: 0,
startY: 0,
endX: 0,
endY: 0,
})
const selectionBoxStyle = computed(() => ({
left: Math.min(selectionBox.value.startX, selectionBox.value.endX) + 'px',
top: Math.min(selectionBox.value.startY, selectionBox.value.endY) + 'px',
width: Math.abs(selectionBox.value.startX - selectionBox.value.endX) + 'px',
height: Math.abs(selectionBox.value.startY - selectionBox.value.endY) + 'px',
}))

function startSelection(event) {
event.preventDefault();
event.stopPropagation();
if (event.button === 2) return; // Ignore right-click for selection
isMouseDown.value = true;
selectionBox.value.visible = true;
const canvasWrapperRect = canvasWrapperRef.value.getBoundingClientRect();
selectionBox.value.startX = (event.clientX - canvasWrapperRect.left - canvasOffsetX.value) / scale.value;
selectionBox.value.startY = (event.clientY - canvasWrapperRect.top - canvasOffsetY.value) / scale.value;
selectionBox.value.endX = selectionBox.value.startX;
selectionBox.value.endY = selectionBox.value.startY;

    function onSelection(event) {
      if (!isMouseDown.value) return;
      const canvasWrapperRect = canvasWrapperRef.value.getBoundingClientRect();
      selectionBox.value.endX = (event.clientX - canvasWrapperRect.left - canvasOffsetX.value) / scale.value;
      selectionBox.value.endY = (event.clientY - canvasWrapperRect.top - canvasOffsetY.value) / scale.value;
    }

    function stopSelection(event) {
      if (event.button === 2) return; // Ignore right-click for stopping selection
      isMouseDown.value = false;
      selectionBox.value.visible = false;
      selectedElementIndices.value = [];
      const boxLeft = Math.min(selectionBox.value.startX, selectionBox.value.endX);
      const boxRight = Math.max(selectionBox.value.startX, selectionBox.value.endX);
      const boxTop = Math.min(selectionBox.value.startY, selectionBox.value.endY);
      const boxBottom = Math.max(selectionBox.value.startY, selectionBox.value.endY);

      _modelValue.value.forEach((element, index) => {
        const elementLeft = element.x;
        const elementRight = elementLeft + element.width;
        const elementTop = element.y;
        const elementBottom = elementTop + element.height;

        if (elementLeft < boxRight && elementRight > boxLeft && elementTop < boxBottom && elementBottom > boxTop) {
          console.log('=log=stopSelection=', element.id)
          selectedElementIndices.value.push(index);
        }
      });

      document.removeEventListener('mousemove', onSelection);
      document.removeEventListener('mouseup', stopSelection);
    }

    document.addEventListener('mousemove', onSelection);
    document.addEventListener('mouseup', stopSelection);
}

</script>

<template>
  <div class="container" @dblclick.left="deselectElement" >
    <!-- 外侧画板  -->
    <div class="canvas-wrapper"  ref="canvasWrapperRef" @contextmenu.prevent  @wheel="onCanvasWheel"
         @mousedown.left="startSelection($event)"
         @mousedown.right="startCanvasDrag($event)">
      <!-- 内侧画布     -->
      <div class="canvas-grid" ref="canvasGrid" :style="canvasStyle">
        <div
            v-for="(element, index) in _modelValue"
            :key="index"
            :class="[elementClass(element.type), {selected: selectedElementIndex === index || selectedElementIndices.includes(index) }]"
            :style="{
            left: element.x + 'px',
            top: element.y + 'px',
            width: element.width + 'px',
            height: element.height + 'px',

          }"
            class="base_box"
            @click.left="selectElement($event, index)"
            @mousedown.stop="startDrag(index, $event)"
        >
          <Component :is="getComponentByType(element.type)"/>
          <div class="resize-handle" @mousedown.stop="startResize(index, $event)"></div>
          <div class="delete-handle" @click.stop="deleteElement(index)">X</div>
        </div>

        <div v-show="selectionBox.visible" class="selection-box" :style="selectionBoxStyle"></div>
      </div>


      <div class="zoom-controls">
        <button @click="zoomOut">-</button>
        <span>{{ Math.round(scale * 100) }}%</span>
        <button @click="zoomIn">+</button>
      </div>
    </div>
  </div>
</template>

<style scoped lang="scss">
  .container {
    display: flex;
    height: 600px;
    user-select: none;
  }

  /*对应的画布信息*/
  .canvas-wrapper {
    flex: 1;
    overflow: hidden;
    position: relative;
    background-color: #fbf8ef;
    height: 600px;
    border: 1px solid #ccc;
    .zoom-controls {
      position: absolute;
      right: 26px;
      bottom: 26px;
    }
  }

  /*画板网格*/
  .canvas-grid {
    position: absolute;
    top: 0;
    left: 0;
    width: 10000px;
    height: 10000px;
    background-image: linear-gradient(rgba(224, 224, 224, 0.6) 1px, transparent 1px), linear-gradient(90deg, rgba(224, 224, 224, 0.6) 1px, transparent 1px), linear-gradient(rgba(160, 160, 160, 0.4) 1px, transparent 1px), linear-gradient(90deg, rgba(160, 160, 160, 0.4) 1px, transparent 1px);
    background-size:
        5px 5px,
        5px 5px,
        25px 25px,
        25px 25px,
        125px 125px,
        125px 125px;

    .base_box {
      display: flex;
      align-items: center;
      justify-content: center;
      p {
        text-align: center;
        margin: 6px 0;
      }
    }
  }


  .element_box1 {
    position: absolute;
    background-color: rgba(0, 123, 255, 0.5);
    border: 1px solid #007bff;
    cursor: move;
    display: flex;
    align-items: center;
    justify-content: center;
    border-radius: 5px;
  }

  .element_box1.selected {
    border: 2px dashed #ff0000;
  }

  .element_box2 {
    position: absolute;
    background-color: rgba(255, 165, 0, 0.5);
    border: 1px solid #ffa500;
    cursor: move;
    display: flex;
    align-items: center;
    justify-content: center;
    border-radius: 5px;
  }

  .element_box2.selected {
    border: 2px dashed #ff0000;
  }


  .placeholder {
    position: absolute;
    background-color: rgba(0, 255, 0, 0.5);
    border: 1px solid #00ff00;
    cursor: move;
    display: flex;
    align-items: center;
    justify-content: center;
    border-radius: 5px;
  }

  .placeholder.selected {
    border: 2px dashed #ff0000;
  }


  .resize-handle {
    position: absolute;
    width: 10px;
    height: 10px;
    background-color: #007bff;
    bottom: 0;
    right: 0;
    cursor: se-resize;
    border-radius: 5px;
  }

  .delete-handle {
    position: absolute;
    top: 0;
    right: 0;
    width: 20px;
    height: 20px;
    background-color: #ff0000;
    color: #fff;
    display: flex;
    align-items: center;
    justify-content: center;
    cursor: pointer;
    border-radius: 5px;
  }

  .drag-panel {
    width: 200px;
    background-color: #f8f9fa;
    display: flex;
    flex-direction: column;
    align-items: center;
    justify-content: center;
    padding: 10px;
    border-left: 1px solid #dee2e6;
  }

  .selection-box {
    position: absolute;
    border: 1px dashed #007bff;
    background-color: rgba(0, 123, 255, 0.2);
  }
</style><script setup>
const props = defineProps({
layout: {
type: Array,
required: true,
default: () => []
}
})
function elementClass(type) {
switch (type) {
case 1:
return 'box_01';
case 2:
return 'box_02';
case 3:
return 'box_03';
default:
return '';
}
}
function getType(type) {
switch (type) {
case 1:
return '教室';
case 2:
return '图例';
case 3:
return '占位矩形';
default:
return '未知';
}
}
</script>
<template>
<div class="canvas-grid">
<div v-for="(element, index) in layout" :key="index" :class="elementClass(element.type)" :style="{
left: element.x + 'px',
top: element.y + 'px',
width: element.width + 'px',
height: element.height + 'px'
}">
{{ getType(element.type) }} <br/>
x: {{ element.x }}
y: {{ element.y }}<br/>
w: {{ element.width }}
h: {{ element.height }}
</div>
</div>
</template>
<style scoped lang="scss">
.canvas-grid {
position: relative;
width: 100%;
height: 600px;
overflow: hidden;
border: 1px solid #ccc;
background-image: linear-gradient(rgba(224, 224, 224, 0.6) 1px, transparent 1px), linear-gradient(90deg, rgba(224, 224, 224, 0.6) 1px, transparent 1px), linear-gradient(rgba(160, 160, 160, 0.4) 1px, transparent 1px), linear-gradient(90deg, rgba(160, 160, 160, 0.4) 1px, transparent 1px);
background-size:
5px 5px,
5px 5px,
25px 25px,
25px 25px,
125px 125px,
125px 125px;
.box1_mini {
width: 100%;
height: 100%;
display: flex;
align-items: center;
justify-content: center;
border-radius: 5px;
p {
line-height: 12px;
height: 12px;
margin: 6px 0;
text-align: center;
}
&.active_color_01 {
background-color: #fc5e58 !important;
}
&.active_color_02 {
color: white;
background-color: #0cc492 !important;
}
&.active_color_03 {
color: black;
background-color: #e6e6e6 !important;
}
&:hover {
box-shadow: 0 0 10px #57717d;
}
}
}
.box_01 {
position: absolute;
background-color: rgba(0, 123, 255, 0.5);
border: 1px solid #007bff;
cursor: move;
display: flex;
align-items: center;
justify-content: center;
border-radius: 5px;
}
.box_02 {
position: absolute;
border: 1px solid #999;
display: flex;
align-items: center;
justify-content: center;
border-radius: 5px;
}
.box_03 {
position: absolute;
background-color: #c0c0c0;
color: #fafafa;
display: flex;
align-items: center;
justify-content: center;
border-radius: 5px;
}
</style>组件展示效果(实现示例)
下面的是我封装的两个组件的效果,一个进行布局的组件,一个进行数据解析的组件。
编辑智慧教室布局智慧教室布局展示
x: 0 y: 0
w: 150 h: 100
x: 0 y: 150
w: 460 h: 100
x: 0 y: 300
w: 150 h: 100
操作介绍
- 分画板和画布。
- 按住右键,可以拖动画布。
- 画板中的元素可以拖动,缩放,删除。
- 鼠标滚轮可以放大缩小画布。
- 鼠标左键可以框选中多个元素,然后进行多元素拖拽。